Showing posts with label tutorial. Show all posts

60s Bombshell with Covergirl + $100 Giveaway

Thursday, February 6, 2014

So, so excited to be sharing my second video with you guys! CoverGirl recently asked me to review their new Bombshell line comprised of mascara, eyeliner, and beautiful cream shadows which immediately reminded me of 60s French scarlets with smokey cat eyes like Catherine Deneuve and Brigitte Bardot.


I picked up the Bombshell Volume by Lashblast Mascara in Very Black, Bombshell Intensity Liner in Pitch Black Passion, and Bombshell Shine Shadow Eye Shadows in Ooh La Lilac and Ice Queen at Wal-Mart and set to work transforming myself into a 60s bombshell!

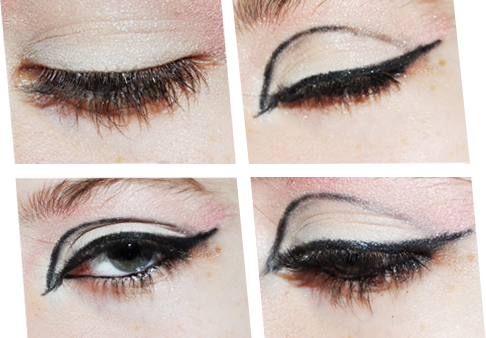
It was so fun playing with these products - the cream shadows blended beautifully and I love that they could be sheered out or packed on to intensify the color. I usually don't use felt tip eyeliners, but found the Bombshell Intensity Liner worked like a dream for applying my favorite look - cat eyes!

I've been having terrible luck with mascaras - I've looked high and low (literally - both at high and low-end products!) but nothing has truly wowed me - but Bombshell Volume Mascara is something special! After applying with it's special duel ended wands - one a volumizing basecoat, the other a intensifying topcoat - not one but two people asked if I was wearing false lashes! Incredible.

ON MY FACE:
Smoothers Liquid Make Up in Buff Beige
TruMagic Skin Perfector
Lip Perfection Jumbo Gloss Balm in Blush Twist
Ice Queen
Ooh La Lilac
Bombshell Intensity Liner in Pitch Black Passion
Bombshell Volume by Lashblast Mascara in Very Black
Contouring Blush in Peach Perfection

And, CoverGirl is offering one Mermaidens' reader a $100 giftcard to Wal-Mart! Use the Rafflecopter widget below to enter! Giveaway ends February 12th and is open to United States residents only. Winner will be contacted via email or twitter. If winner doesn't reply to email within 24 a new winner will be chosen. Good luck!

a Rafflecopter giveaway

Disclosure: This is a sponsored post. All opinions are my own. The Walmart gift card and information have been provided by CoverGirl.

How To Make a Zine

Friday, July 27, 2012


OR HOW I MADE PISTACHIO

It's been almost three months since I debuted Pistachio, and I'm still over the moon with what an incredible experience it was! I have been asked several times to help out with other people's zines and how I made my own, and since I've begun the beginning processes of creating the second issue, I thought now would be the perfect time to share with you How I Made Pistachio:

NO 1: FIND INSPIRATION
Regardless of whether it is a child's painting or the Mona Lisa, you need to be inspired by something and have a clear picture of what kind of theme, tone, and overall color scheme you want for the zine. I went through images and clippings I had saved to help shape the tone and theme I wanted.

NO 2: PUT PEN TO PAPER
Write the articles you want to write, draw the drawings you want to include, and take the pictures you want to take for the zine. Also, if you have started getting ideas for how you want the zine to look, sketch out layout ideas - this helped me figure out how I wanted arrange a series of pictures and text on a page.

NO 3: ASK FOR SUBMISSIONS
Now this isn't mandatory, but I cannot recommend it highly enough! I felt so honored when people I really admired consented to being a part of the zine, and when I posted a call for submissions here I received some really incredible submissions by people I didn't even know read my blog! Of course, there was some entries I had to turn down - they were great, but just didn't fit the aesthetic of my zine. Turning them down was hard, but this is *your* vision and you should not be obligated to include anything you don't want to. Just be kind when you tell them you can't use their piece!

NO 4: PUT IT ALL TOGETHER
Compile all of the illustrations, submissions, and articles and begin designing your zine! This was the most difficult part - there were so many possibilities! Using Photoshop CS4 and a design inspiration Pinterest board to help me, I designed and put together all the different elements into a page. One thing I noticed was I could spend hours and hours arranging all the pieces in the slightest different ways - and it got to the point where I was just wasting time. Unless you want a super sleek, professional quality zine, do not sweat the small stuff - for my specific case, what I was making was just supposed to be a fun, personal side project!

NO 5: FORMAT FOR PRINTING AND ISSUU
Another part I struggled with was the actual process of printing and figuring out how to upload it to Issuu, a site I really love because it allows you to flip through the zine as if it was a real magazine! I made two different versions of the zine, one formatted like the standard half-size zine (a great diagram for this can be found here) and the other as a pdf file to upload to Issuu. For more about uploading documents to Issuu, visit here.

NO 6: UNVEIL YOUR ZINE, PRINT OUT A COPY,
AND CRY OVER HOW PERFECT IT IS

Pretty self-explanatory! By the time I completely Pistachio, it was completely different from what I imagined and nowhere near perfect - but that didn't matter! I had created something I felt truly proud of and couldn't wait to share it with you all. As I said to my friend who expressed doubt over her artistic skills and thus felt like she couldn't make one herself, one of the best aspects of zines is that you are in control and can do anything you want with the zine - it doesn't matter if you aren't the world's greatest writer or artist, just write or illustrate what you feel and that will be good enough.

Feel free to email or comment asking questions, and I will try to answer them to the best of my ability! Also please let me know about any zines you have created or are planning to make! I wanna hear about them ^^

Floral background is courtesy of Pugly Pixel

♡,
Kailey


How To: Make Your Own Valentines

Friday, February 3, 2012

Personally, I have always LOVED Valentine's Day! I take this holiday as an opportunity to give my loved ones Valentines and show them how much I appreciate them (I firmly believe that this holiday shouldn't be ~exclusive~ for couples!) and eat wayyy too much discount chocolate on the 15th. I thought it might be fun to share with you how I make these valentines, and hopefully inspire a few of you to make some as well!

You Will Need
1. Multicolored cardstock/construction paper (and lots of it! Use any colors you would like, but be sure to have white on hand!)
2. Glue
3. Scissors
4. Fiskars Paper Edgers (optional)
5. Sequins and rhinestones
6. Magazine clippings of your favorite people/things (optional)

Begin by cutting out heart shapes - don't worry about making them perfect!

Glue this heart onto white paper, and using Fiskars Paper Edgers, cut around the heart. This will give the paper a white patterned edge (if you do not have any of these scissors, you can hand cut scallops out, but this will be more time consuming).

Now, line the colored heart with glue, and place sequins around the entire valentine.

(This might take a while)

Once you are finished, we have these beautiful bases! You can decorate these any way you want - I have a few examples of what I did below!

For the valentines on the left and middle, I cut out magazine clippings of Edward Scissorhands and Saved by the Bell and used sequins to add some ~pizazz. For the valentine on the right, I sketched out Siouxsie Sioux and then cut out the shape of her hair, eyebrows, eyes, and the mouth with paper.

For this pink one, I simply glued rhinestones onto the heart. Instant pretty!

And lastly, I made this card by cutting out the shapes and assembling them into the image of Batman and Superman. As a particularly fitting finishing touch, I added this mushy line: "You're My Kryptonite".

And there you have it! Pretty please let me know if you use this tutorial to make your own (I'd absolutely love to see them), and if you have any questions feel free to leave me an email or a comment!

♥, Kailey

Make-Up How To: Annie Potts in Pretty in Pink

Friday, October 14, 2011

Caroline suggested I do a tutorial of Iona's make-up in PRETTY IN PINK. Being a huge fan of striking make-up, I jumped at the challenge. This is my first tutorial, and any feedback would be greatly appreciated! If you have any questions, feel free to ask.

You Will Need:
- Eyeshadow primer (I'm using Laura Mercier Eye Basics in Cotton)
- Black mascara
- Eyelash Curler
- Black eyeliner
- Light purple eyeshadow (I'm using #5 in the Pixi Mermaid kit)
- Pink eyeshadow (I'm using Two Faced I Know What Boys Want)

STEP ONE:
Prep your eyes with your favorite primer, and begin covering your eyelid all the way to the brow bone in a light purple shadow. Next, use a pink shadow on the crease and brow bone.

STEP TWO:
Line your upper and lower lids with a fine pointed black eyeliner pencil - if you are more comfortable using liquid eyeliner, feel free to do so! End the lids with a cateye. Next, make a half-circle right above the crease. This can be rather tricky - I usually have to redraw the lines several times to get the shape I want.

STEP THREE:
Reapply light purple shadow to lid and pink shadow to crease and brow bone. Finish with mascara and curl your lashes.

Your end result should resemble something like this:

♥, Kailey

Mermaidens - Musings of a Modern Mermaid ©2011-2014 All rights reserved
Portrait in Header Illustration by Sibylline Meynet designed by Designs Blue Moon